
MANAGE SHIPMENTS
Buildabazaar provides you the option of viewing all the shipments under each state. To view the list of shipments in different states:
In the Admin Panel page, place the cursor on the Purchases drop down menu and click Manage Shipments. The Fulfillment Panel page, with the different transition states of shipments, open.

Different transition states present in the list are:
- Confirmed: Displays the list of shipments which have been successfully paid for by the customer. To view the list of shipments in confirmed state:
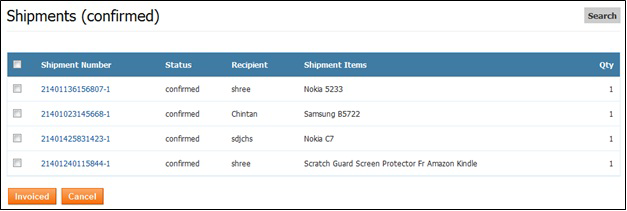
In the Fulfillment Panel Page – Shipments List, click Confirmed. The Shipments (Confirmed)page opens, which has a list of shipments in confirmed state.
- Invoiced: You have the option to invoice a shipment, view shipment details and edit shipment here.

To Invoice a Shipment from the Shipments (Confirmed) page:
- In the Fulfillment Panel Page – Confirmed Shipments List, select the check box against the relevant shipment number and click Invoiced. The shipment number selected moves to the Invoiced transition state
You also have an option to invoice all the shipments at a time. To invoice all shipments:
- In the Fulfillment Panel Page – Confirmed Shipments List, select the check box against Shipment Number field and click Invoiced. All the shipments move to the Invoiced stage.
To View and Edit Shipment Details:
In the Fulfillment Panel Page – Confirmed Shipments List, click on the shipment number link. The Confirmed Shipment page opens, where you can view the shipment details.
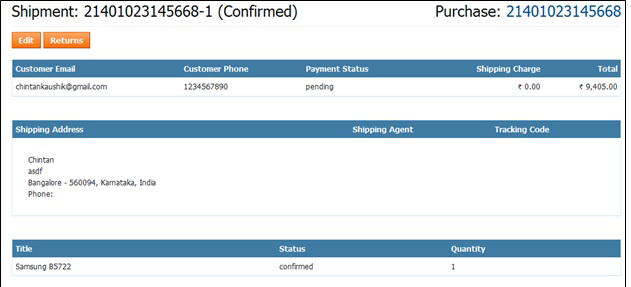
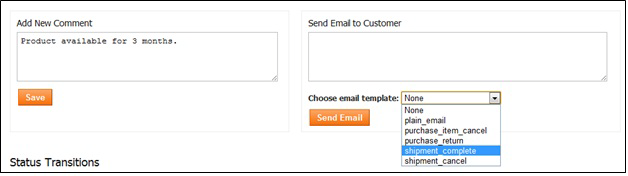
Shipment details consist of customer email address, phone number, payment status, and all details related to the shipment. You have the option to add a comment and send an email to the customer as well. Comments are entered for your own reference. Emails can be sent to customers depending upon the message to be conveyed. The message may vary from sending information about the shipment, returning the purchase, canceling the purchase and so on. The following screen-shot depicts the Comments section.
To Add a New Comment:
- In the Fulfillment Panel Page – Comments Section, enter the comment in the Add New Comment box and click Save. A message stating ‘Successfully Added Comment’ appears and the comment added is displayed in the same page with the date and time.
To Send an Email to the Customer:
- In the Fulfillment Panel Page – Comments Section, enter the relevant text in the Send email to Customer box.
Choose an email template from the Choose email Template drop down list box and click Send email. A message stating ‘Successfully Sent email to Customer’ appears.
Editing Shipment Details:
You can also edit shipment details for a purchase. To edit shipment details:
- Click Edit in the confirmed shipment details page. The Edit Shipment(Confirmed) page opens.
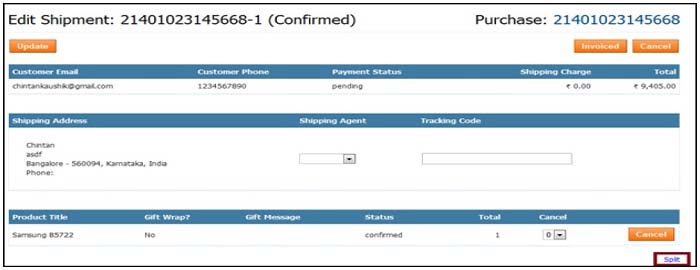

- You have the option to edit shipment details such as changing the shipping agent, entering tracking code, and so on.
- You can choose to split shipments if multiple Items in a Purchase have to be sent in different Shipments.
To Split a Shipment:
- In the Edit Shipment (Confirmed) page, click Split. The Split Shipment option appears. You have the option to split the shipment or to cancel the split.


- On the Qty drop down list box, choose the quantity of the product to be split.
- Click Split Shipment. A message stating ‘Split Successful, New Shipment url’ appears with the new shipment URL.


